Showing posts with label Wedding Invitations. Show all posts

Wednesday, June 19, 2013

Mail Merging: A Life Saver


Mail Merging: A Life Saver

How to create address labels and letters in a flash!

By: Miranda Weidemier


As you know, there are lots of things to be personalized and set out throughout the course of planning your wedding. Starting with “Save the Dates” or engagement party invitations and ending with thank you cards. These can be dreadful and tedious processes, especially when you have 300 people on your guest list. Microsoft Excel and Word will become your best friend when dealing with mailings and letters. By using the “Mail Merge” feature in word, you can customize mailing labels and thank you letters for all of your guests in minutes.

First, you will need to make an excel spreadsheet with your guests’ information. Important columns to include are title (Mr., Mrs., etc.), first name, last name, address, city, state, and zip code. Your spreadsheet should look something like this:


Make sure all of the information is formatted correctly in the spreadsheet before moving on to the mail merge. One thing you will need to format is the zip code column. You will notice that if a zip code starts with a zero, that zero will disappear. To format the column, you will need to highlight it, right click, and click Format Cells. You can then select “Special” from the category box, select “Zip Code” from the Type box and click okay. Now you should save this spreadsheet. Once your information is complete it is ready to start the mail merge!


Next, you will open a new Word Document. Click on Mailings > Start Mail Merge and select the type you want to run. Labels is probably the one you will appreciate the most. Then, Click Select Recipients > Use Existing List. Find your excel spreadsheet and open it, this will connect your document to your spreadsheet. Click Mailings > Edit Recipient List, here you can select the columns you want to include in your merge. You will want to format these fields as you want them to appear on the label itself. This means inserting a space between each field, putting a comma after “<<City>>” and entering the fields into three lines like a traditional address is written. You will also want to format font size, type, and color at this stage. Double check to make sure you have completed all formatting.


You can now preview your labels to make sure they look exactly how you want. If not go back and format them to your liking. If you are happy with the results, you can complete the mail merge and print and any kind of labels you desire. A label will print out for each address on your guest list. It will look something like this:


Friday, June 7, 2013

Wedding Invitations! Things to keep in mind.

Wedding Invitations! Things to keep in mind.

Tips for Invitations


Wedding invitations are one of the first big decisions you’ll need to make when planning for your special day! Though it may seem easy enough, choosing the right invitation for your wedding can be harder than you think – and there are a few things you should keep in mind when crossing this item off your list!

1. Make sure they go with your theme

Even if you don’t feel deciding on a theme is necessary, your wedding should have some sense of continuity to it to give guests an idea of what to expect. Give them something to be excited about, whether it is a color scheme or an elaborately planned theme. A wedding invitation serves as a first impression to your guests, so choose your design carefully!
2. Set a budget

Often, invitations will cost a lot more than you bargained for – so make sure you work with your vendor to come up with a design that fits your budget. After all, they are custom products. But don’t worry, you can still get super cute invitations and be cost-friendly!


3. Postage

It’s a good idea to take one of your fully assembled wedding invitations to the post office before you send them out to make sure the postage you think you need is the correct amount. Invitations may end up being thicker or heavier than the standard mailing size, and therefore require extra postage. If you don’t check beforehand, you might end up with hundreds of returned letters marked “incorrect postage” in your mailbox a few days later, and really, who wants that?!

4. Proofread

It is SOO important to proofread before you send everything out! Have your family, friends and fiancée read through the invitation and guests’ names and addresses before you finalize. After all – how embarrassing would it be to have the wrong date or time printed on those invites?  Checking everything over beforehand will be worth it, promise. ;)
5. Give yourself enough time

Make sure you work with the printer of your invitations early enough to know how long the process of choosing, designing, and printing your invitations will take. Having to wait a week or two to send them out is better than driving yourself crazy waiting for them to come in so you can send them out on time.
6. Samples

Always purchase a sample of the invitation you are thinking of buying. Having a physical copy, not just a digital one, can make deciding between two designs easier, and you can get a feel or the quality and look of the invitation. Buying a sample will be worth it in the long run!


It’s more complicated than it seems, isn’t it? With these tips, choosing an invitation and sticking to your budget and timeline will be easy, and you can move on to planning the rest of your big day. Good luck!!

- Carina


Tuesday, December 25, 2012

The Perfect Christmas Wedding


It's the most wonderful time of the year...literally! What could be better than having your family all gathered around a perfectly lit tree and seeing the church decked from top to bottom? In the spirit of the season, why not have a Christmas wedding?!?!?! Here are a few choice ideas and tips to have a fantastic Christmas wedding with all the trimmings.

Wedding Colors:
Red and green are natural colors for a Christmas wedding – It is likely that your church or reception site will already be decorated in red and green for other events and holiday parties. But don't feel limited to this palate. Other possibilities, which will work with existing decorations, include:

·         silver and white
·         silver and light blue
·         burgundy, forest green, and gold (as long as the existing decorations aren't too primary)
·         gold and cream


                                                              Christmas Wedding Invitations:
You'll want to reflect the season and your theme, but you won't want it to look like a holiday card. The solution? Forgo a folded card, opting for the traditional thick white card, with a border and engraved or thermo-graphed text. You can highlight the Christmas wedding theme in the border with white snowflakes, an elegant holly trim, or a drawing of a poinsettia.

Since people make plans for the holidays early and often have many parties and events to attend at this time of year, you'll want to send your invitations a little bit early – about 12 weeks before the event. You might also consider "save the date" cards in addition to the invitations, which will ensure that those most important to you will be able to attend.


Wedding Cake:
Having each tier look like an individually wrapped package is a popular look that is perfect for a Christmas wedding. You might also do a take on a buche noel or yule log, with a tiered chocolate cake that has holly – either real or made of gum paste – cascading down the side. Use marzipan, an almond paste used in many holiday desserts, as a filling.


Bridesmaids Attire for a Christmas Wedding:
My favorite bridesmaid look for a Christmas wedding is long dresses with shrugs or capelets and a big faux-fur muff. But you can dress them in your wedding colors; give them long wraps or sparkly accessories, all of which will help evoke your theme.


And the Bride Wore:
A Christmas wedding dress needn't be that different from any other kind. Wear the one that flatters you most, and top it off with a long red velvet cape. Or embrace the trend of color in wedding dresses by adding a beautiful red silk sash to the waist of your gown. You could also seek a dress with lots of sparkly beads and sequins to evoke the snowiness of the season. And of course, a faux-fur wrap and muff are always fun.


Flowers and Décor:
Since flowers can be more expensive at this time of year, think creatively. A mirrored platter with pillar candles and sprigs of holly is both elegant and romantic. Buy ornaments in bulk on-line, and create centerpieces of bowls or vases of ornaments. For a simple but elegant look, put pots of poinsettia with a ribbon trim in the center of each table. Fake snow used to be tacky, but there are now very good products available. Set candles or small flower arrangements in the middle of snow. And for my favorite touch, use fake snow instead of an aisle runner. Or, you can always hire a snow-making machine to really make your Christmas wedding a winter wonderland.


Xoxo!

Katherine


Friday, December 21, 2012

DIY Friday: Wedding Invitation Ornament


DIY : Wedding Invitation Ornament

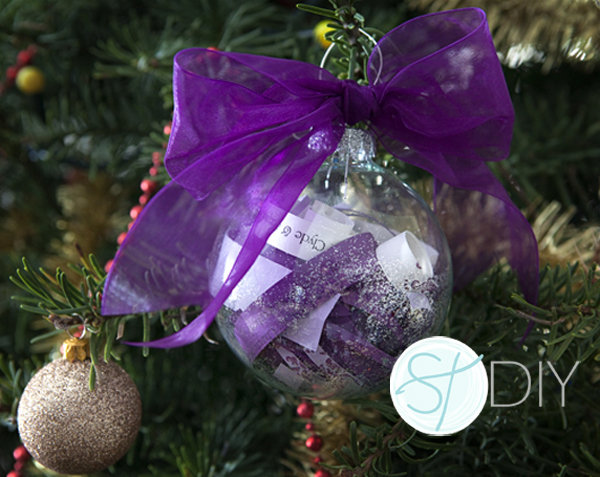
Why buy a generic ornament to mark your first wedded Christmas when you can create one that is truly unique to you? These Wedding Invitation Ornaments from our blogger friend Jen at SomethingTurquoise.com are quick, easy, and inexpensive to make; they'll showcase a couple's love for years to come. Grab a pair of scissors and start creating some holiday magic! Thank you to Bridalguide.com for posting such an amazing top! All of these photos are theirs via Mary Gillen of the-budget-guru's blog

Materials:

  • Wedding invitation
  • Large 4'' globe ornament
  • Your choice of glitter or paint (you can also use both)
  • Ribbon
  • Mod Podge
  • Scissors
  • Paper trimmer
  • Paint brush

​Option 1: Glitter-Glam Ornament
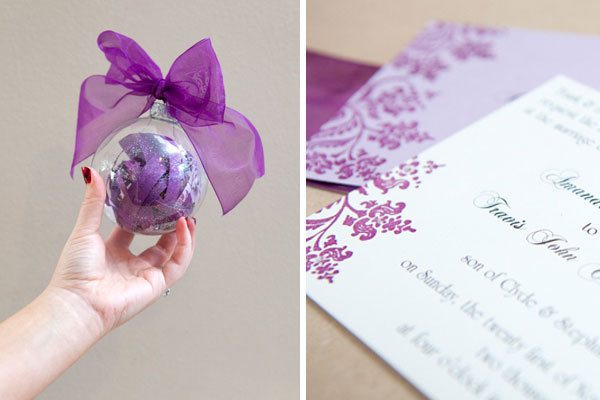
purple wedding invitation ornament

Step 1: Assemble The Paper Strips

  • Gather your invite card, RSVP card, and map card (if you have one). 
glam wedding invitation ornament
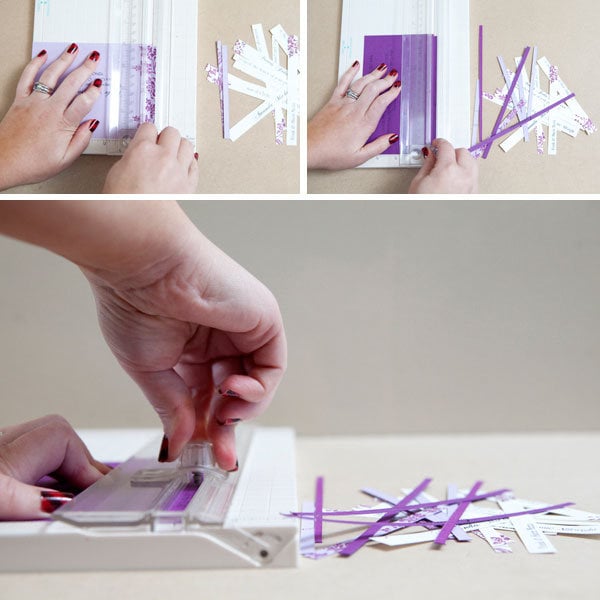
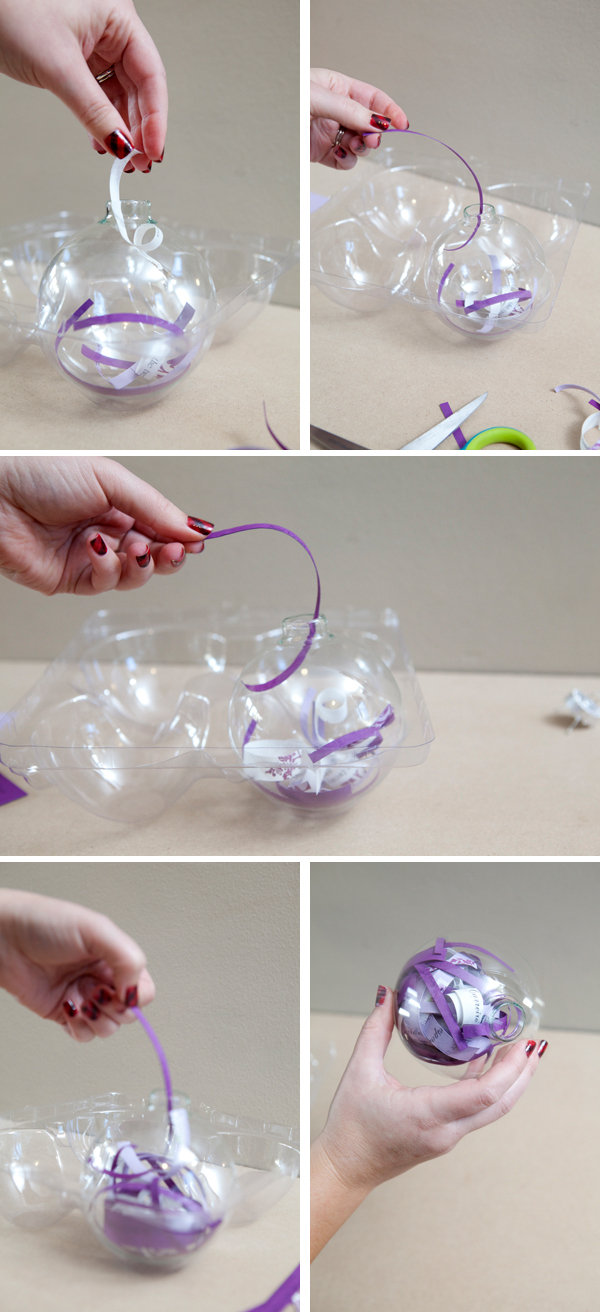
  • Use the paper trimmer to cut the invitation into thin strips of paper. Be careful not to slice through important words! Also, make sure that your strips are able to fit through the opening of your ornament.
cutting the strips of invitation
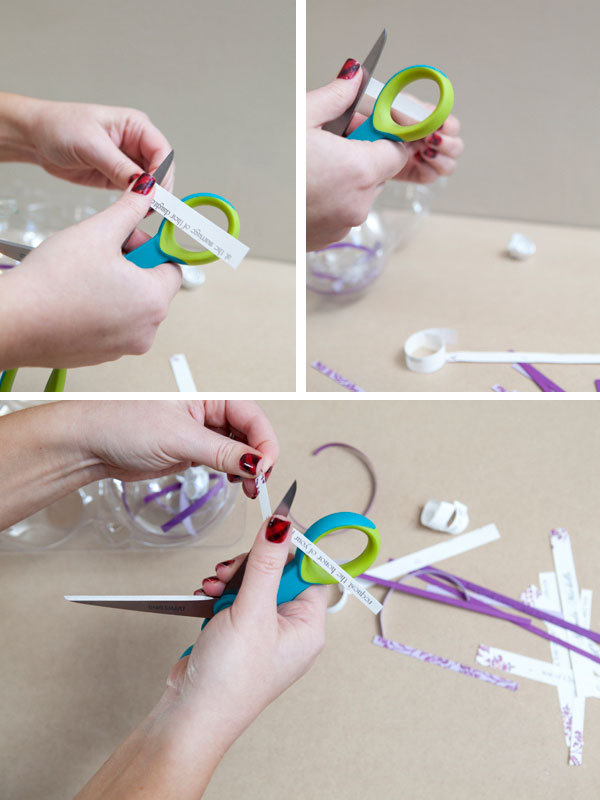
  • Next, run the paper strips over your scissors, just like you would to curl a ribbon. Some types of paper will curl much easier than others— wrap it into a curl shape as best as you can.
curl the strips of invitation with scissors
  • Then, piece by piece, insert each paper strip into your ornament. Alternate colors, so that the ornament is more eye-catching!
place strips inside the globe
  • Shake your ornament around to get the papers to mesh together (the ornament looks best when it's packed full of paper).

Step 2: Add Glitter

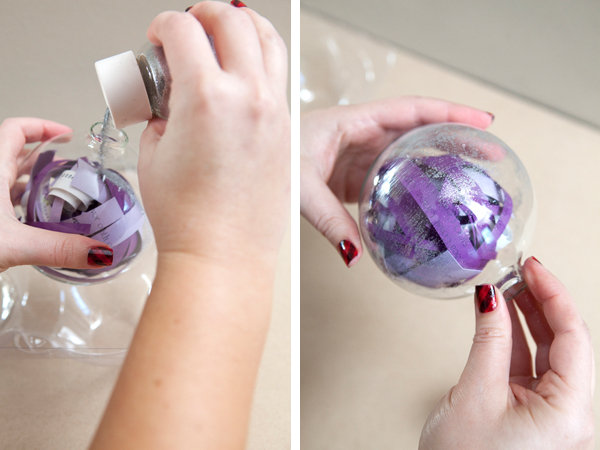
  • In this example, Jen added a little glitter to the inside of the globe for some extra sparkle.
adding glitter to the ornament
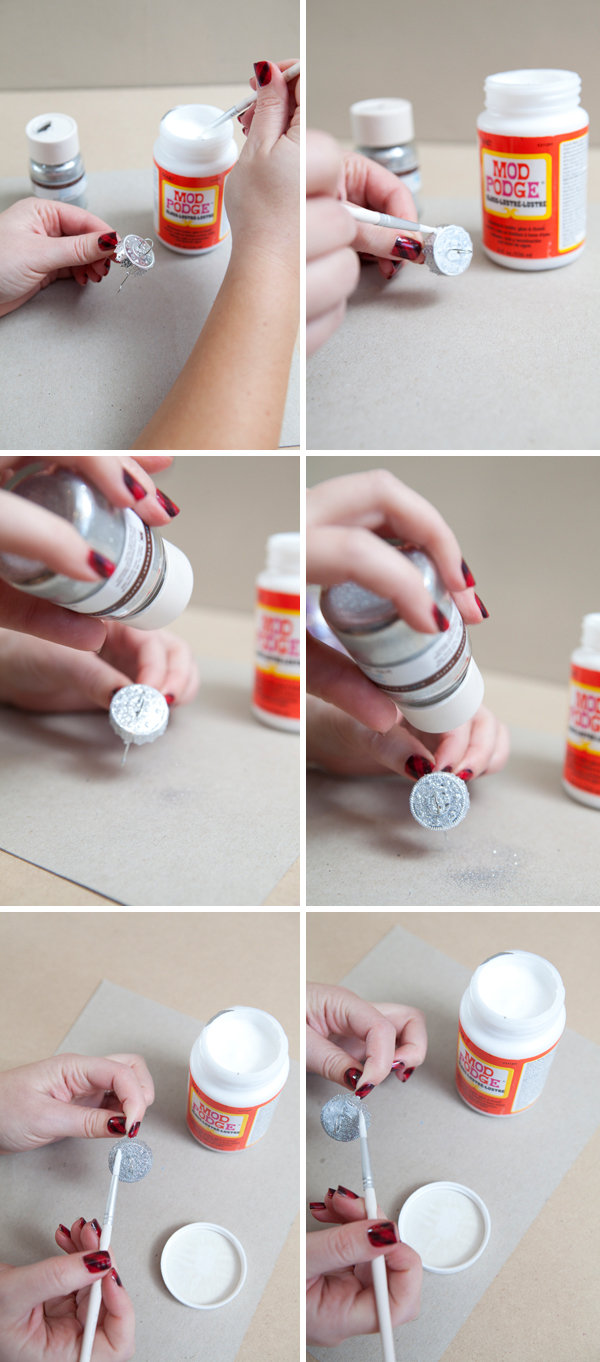
  • Next, it's time to decorate the silver top of the ornament. Layer it with Mod Podge, then cover with glitter. Once it's completely dry, add a second coat of Mod Podge to seal the glitter.
adding mod podge

Step 3: Put The Finishing Touches

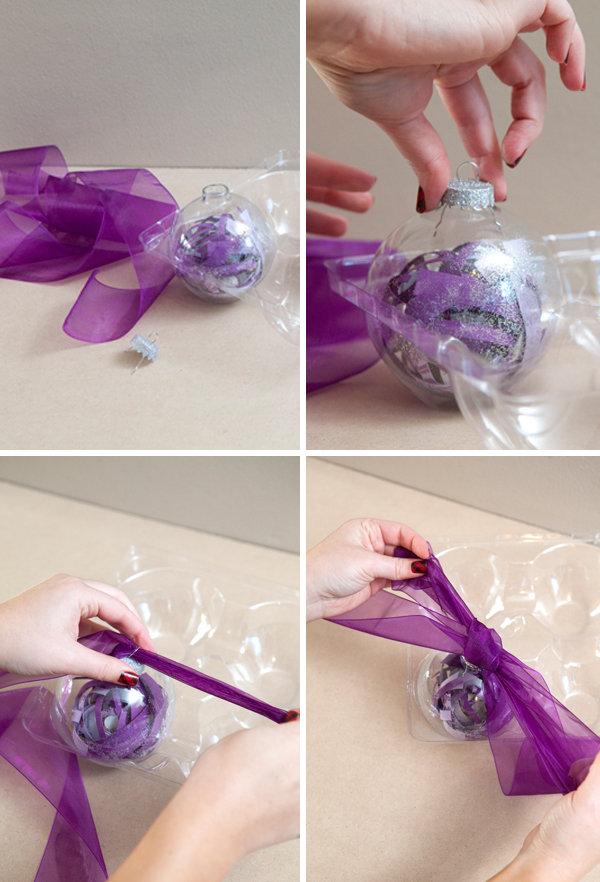
Finish by putting your glittery top in place and tying an oversized bow. There you have it, a fabulous addition to any tree!
put the top on the ornament \

Have fun everyone!!!

xoxo

Katherine

Monday, July 9, 2012

Inviting Disney Characters


I came across this the other day while I was on Pinterest, and I thought it was an absolutely adorable idea. Growing up watching Disney Princess movies and other various Disney related shows, it would be an understatement to say that I was and still am a huge Walt Disney fan. Something about each princess finding their Prince Charming and all those catchy songs sold me on the collection early on. Therefore when I came across this I found it to be a great idea and I just had to share with the other Disney fans out there!

Apparently, if you send Mickey and Minnie and/or Cinderella and Prince Charming a wedding invitation they will each send back their own response.

Mickey and Minnie send back an autographed photo and a “just married” button.


Cinderella and Prince Charming send back an autographed congratulatory certificate.


Here are their addresses if there are any readers who are interested J

Mickey and Minnie Mouse
The Walt Disney Company
500 South Buena Vista Street
Burbank, California
91521

AND

Cinderella and Prince Charming
P.O. Box 1000
Lake Buena Vista, Florida
32830

What do you guys think of this? Would you send these classic Disney figures a wedding invitation?

xox Lauren